Pragmata Walkthrough: Sector 4 (Lunum Mines)
Overview & Key Takeaways
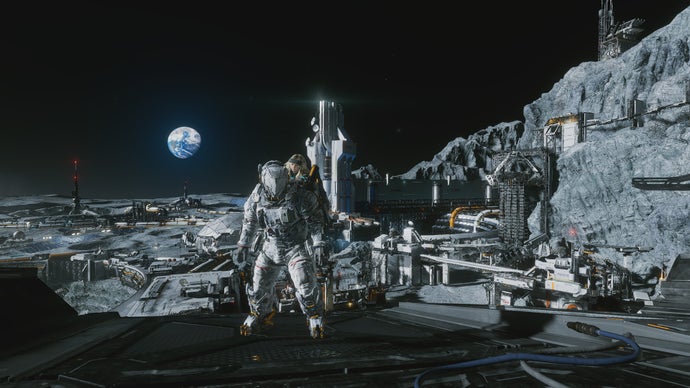
Having trouble in the Lunum Mines of Pragmata's Sector 4? The fourth Sector of Pragmata finally lets Hugh and Diana leave the artifical gravity zones of the Cradle in favour of a little moonwalking. They'll be hopping along the surface of the moon and into its dark corridors as they navigate the Lunum Mines, a drilling facility with its very own terrifying enemy - the behemoth LunaDigger.
Having trouble in the Lunum Mines of Pragmata's Sector 4? The fourth Sector of Pragmata finally lets Hugh and Diana leave the artifical gravity zones of the Cradle in favour of a little moonwalking. They'll be hopping along the surface of the moon and into its dark corridors as they navigate the Lunum Mines, a drilling facility with its very own terrifying enemy - the behemoth LunaDigger.
After the lengthy collectathon quests that defined the Terra Dome, the Lunum Mines are more straightforward, but you'll still need all of your wits and weapons about you if you want to survive the LunaDigger's repeated attacks. Read on, for this guide will present a full walkthrough for Sector 4 of Pragmata, the Lunum Mines, ensuring that Hugh and Diana can avoid becoming moon dust.
Keep in mind that major spoilers follow!
In this guide:
Entering the Mines
Upon entering the Lunum Mines, you can read a screen detailing that the Nexus Tower mainframe is off-limits to most. Obviously, this means you've gotta head there, especially as it's the key to rebooting IDUS. Walk out and enjoy a beautiful moon view. Gravity, or rather the lack of it, changes Hugh's movement considerably here - his jumps are going to feel floatier, and he's slower in general.
Jump down and get the Upgrade Component on a piece of wreckage. Go through the next few doors to reach a lift. This takes you to an area with several platforms and Lunafilaments. There's a Data Shard lying in a box on the ground here, and further investigation will reveal some blockages that you can use the Lim Eraser to remove, revealing a chest with the Equilibrium Mod. This is a good one that restores 10% of Hugh's health when he activates his thrusters.
Once you've picked up the stuff on the group, use your thrusters to jump across to the higher platforms. You can get another Upgrade Component and an excellent new weapon here - Homing Missiles.

Homing Missiles lock on to multiple enemies while charging. Aww yeah, now you're playing with power. | Image credit: Rock Paper Shotgun/Capcom
Further on, you'll reach an open area with more platforms and several spider bots lurking on them. Test out your new Homing Missiles to see how many you can destroy at once. Then use your Lim Eraser to grab all of the items on the ground, including an Upgrade Component. When that's done, go over to the large tower with an "A" marked on it and hack it. You may have noticed that the hacking puzzles are getting trickier - this one calls for you to hit the right button representing each section as the cursor spins in circles, and I found myself failing it a surprising number of times!

Hacking becomes more challenging from here on out, as this darn thing spins ridiculously fast at times. | Image credit: Rock Paper Shotgun/Capcom
Use the large container that the tower drops to jump across the gap, then hack the next door you come across. IDUS will mumble some stuff and suddenly a giantic mechanic worm will appear, smashing into some of the mining equipment in front of you. Meet the LunaDigger, soon to be the bane of your existence.
Dealing with the LunaDigger is a tricky affair as you navigate this Sector. Whenever you're outside and moving about on the ground, look for its telltale rumble beneath the moon's surface. If it gets too close to you, it'll burst up and snatch Hugh in its jaws, forcing Diana to complete a relatively lengthy hack matrix to save him.

Beware, the LunaDigger cometh! | Image credit: Rock Paper Shotgun/Capcom
Shooting the LunaDigger is an exercise in frustration - instead, focus on spending as little time as possible on the moon surface from here on out. Stay in the air as much as you can, and as long as you're standing on something metal (even if its just a piece of wreckage or grating) the worm can't find you.

The LunaDigger can be a real pain. Avoid it, or risk Diana having to act lightning-fast to free Hugh from its jaws. | Image credit: Rock Paper Shotgun/Capcom
Now that we've got this out of the way, drop to the ground and navigate to the red door to your north, taking care to dodge the LunaDigger all the while. You'll notice a red 3D printed Lunafilament blockage on the right that you can't use the Lim Eraser on - you'll need to return to this Sector later to remove it. However, you can grab an Upgrade Component on the way to the door.
The next room has a screen talking about how risks from the LunaDigger are "considered negligible." Haha, whatever. Grab the Freeze Hacking Node (if you haven't already used these, they immobilise bots and are a stellar loadout choice) and prepare to face some enemies. When they're dead, climb up, get the Upgrade Component perched on a white platform above the main room, and enter the door. There's a REM you'll be able to see from afar here; don't worry as we'll get to it shortly.
This next section is dangerous, because you're going to be standing on an upper level above where you previously were with the LunaDigger, and missiles are coming your way. A hit from one can send you falling back down to the lower level, forcing a confrontation with the LunaDigger, so retarget those missiles ASAP.


Retarget those missiles, and safely make it to the Campfire REM as your reward. | Image credit: Rock Paper Shotgun/Capcom
When you're not in danger of being hit by a missile anymore, jump through the gap in the stairs here to get that REM you spotted earlier - it's the Campfire. Then keep on heading upwards into the Crane Operation Yard to find the Crane Control Room Station Escape Hatch.
Crane Operation Yard
Read the nearby reports on the LunaDigger going berserk (so much for all that talk about negligible risks) and pick up a supremely useful new weapon - the Impact Barrier. This defense unit lets you make a shield around yourself that blocks enemies and projectils for a brief period. Just perfect for defending against the LunaDigger.
Forge onwards, get the Upgrade Component outside, and prepare for another moonwalk as you see the LunaDigger rise up in the distance. This area has a lot to collect, and as you run around on the ground, you'll notice that there are some mines that you can activate. Hack a mine and it will release a timed explosion that can temporarily stun the LunaDigger if the big worm is in the vicinity, making it susceptible to a hack and some damage. But don't get too entranced by the idea of killing this thing - it's not feasible, and shooting should be a last resort.

Hack a mine when the LunaDigger's on your trail and watch it stop your big enemy in its tracks. Timing is crucial, however. | Image credit: Rock Paper Shotgun/Capcom
If you ride the crane-operated lift here, you can pick up Analog Aggression, a Mod that increases weapon damage by 10% and decreases hacking damage by 10%. The other nearby Mod is Digital Dominance, which can be found on a long ledge sticking out from a platform on the northern end of the area. Watch out for flying bots aiming at you!
Other notable collectibles in the Crane Operation Yard lie within a building to the northeast of where you pick up Analog Aggression. Within are some enemies, multiple files you can read that relate to the existence of Pragmata on the Cradle (looks like Diana was some kind of poorly-kept secret), and a Mini Cabin Figure atop a pillar on the building's outside corner. After getting the Mini Cabin Figure, you can also hack a control panel on a wall opposite you to make a container fall that you can use to jump across to another chest that contains a Cabin Coin.


After getting the Mini Cabin Figure in the first screenshot here, be sure to hack the nearby control panel, then cross over and open that chest in the second screenshot. | Image credit: Rock Paper Shotgun/Capcom
As you run around collecting everything, you'll unlock a new objective - to infiltrate the warehouse. You'll need to hack a tower with an "A" on it to drop another container that lets you reach a door; once you do so and take the lift down you'll be near the Warehouse Entrance Station Escape Hatch.
Inside the Warehouse
There's a Red Zone near this Escape Hatch and a REM that you can't access yet. Focus on the large block marked "MOVE" - hacking it pushes it back, and you can keep doing this until it displays "LOCKED". Yayyy, block pushing puzzles. Push it twice to enter an enclave where another block is visible. Push that one forward, then climb atop it to see a "LOCKED" block. Jump to the platform next to the "LOCKED" block and move around so that you can see the side of it marked "MOVE." Push it and you'll clear the path to the REM, which is a Bug Net.

To get the REM, push the block marked "MOVE" here, then climb atop it until you can see another block marked "LOCKED", then jump over to that one and navigate to the proper side to move it. Yeah, there are gonna be a lot of block puzzles from here on out. | Image credit: Rock Paper Shotgun/Capcom
After getting the REM, drop back down to the other "LOCKED" block and move it by navigating to its opposite side. Exit via the newly opened route and a Crusher MK-II and a Walker will drop down to fight you. Blast them apart and hack the ceiling control panel to make an opening there. To reach this exit, you'll need to manipulate the blocks next to you so that you have at least one underneath the opening. (If you keep moving blocks in this area, you can also open up a route to a chest with a good amount of Lunafilaments hidden within it.)

To reach that opening in the ceiling, you need to position a block around here. | Image credit: Rock Paper Shotgun/Capcom
On the level above, there are weapons to grab and a Unit Printer. These usually signify that you're gonna have to rumble. Equip yourself and enter the yellow security zone to be locked into an arena.
The most annoying enemy here is the Defender, which pops up four red energy shields during combat. If you remember the Executors that you've previously fought, the gimmick is the same - disable the energy shields by manually targeting them with Hugh's gun. Only when they're down can Diana initiate her hack. Unfortunately, Defenders are hardy opponents, and it'll take time to knock those shields out of commission.


Defenders are tough new opponents. Four red shields are nothing to scoff at, which makes victory all the sweeter when you actually do get a Critical Shot off on them. | Image credit: Rock Paper Shotgun/Capcom
If you're willing to do some more block pushing, there are a few Upgrade Components you can nab here once all enemies are gone. When you're finished, proceed into the next room, open the chest to get the Pure Lunum, restock at the Unit Printer and hack the next door. There's a "MOVE" block nearby; you can push it around to reach an upper chest with four Upgrade Components.
Further progress into this stretch of the Warehouse reveals another Defender and a room with yet another Upgrade Component. Climb atop the container here to get to the upper level; you'll now be in a very large room overlooking multiple blocks that can be moved around (take the hand lift down to do so), and you'll also hear the telltale song of a Mini Cabin Figure - look above you on the orange crane to find it.

Who stuck this little guy up on this crane? | Image credit: Rock Paper Shotgun/Capcom
Drop to the ground. Hack the bottommost "MOVE" block resting atop the platform that isn't marked with either "MOVE" or "LOCKED". Climb atop this platform, jump over to the "MOVE" block you just pushed forward. Then turn around, jump to the "LOCKED" block where the Upgrade Component is, and then push the nearest "MOVE" block. A brief cutscene will play showing the block resting in place, allowing you to reach the upper level. (If this is difficult to parse in text, check the below screenshot.)

Hack and climb atop these blocks in order to push the one you need (number 3 here) to reach the exit. | Image credit: Rock Paper Shotgun/Capcom
There's some Training Data you can obtain after you've climbed up via the block. Take another hand lift, and the Warehouse Exit Station Escape Hatch will also open up, meaning that this is an opportune time to return to the Shelter.
Main Excavation Site
You'll be back outside for much of this section, and your immediate goal is to use a mining rig to move across the long length of lunar field before you. Get the Pulse Carbine and Hacking Nodes from the nearby boxes before you activate the rig, because it will naturally stall halfway through and become a battlefield as IDUS transports several bots your way. The new bot type here is the Air Raider, probably the trickiest flying foe you've faced thus far thanks to its explosive rounds and the fact that lasers start erupting throughout the rig as you're fighting it.

Beware the Air Raider and these lasers. Fighting on this rig is gonna get crowded fast. | Image credit: Rock Paper Shotgun/Capcom
Successfully beating the Air Raider takes you to the Mining Control Room Station Escape Hatch. Activate it, and then keep moving until you're back on the moon's surface. A cutscene where Hugh and Diana observe Earth is viewable if you walk along the cliff. There's also a building here with two chests; move the boxes and drop down the hole in the room to get the Eagle Eye Mod, which boosts attack power by 15% while airborne, and 400 Lunafilament.
Before going through the next orange door, walk to the left of it and climb onto a broken part of the wall to access the Tent REM. Nab it and then retrace your steps through the door to find the remains of a lab. Explore this area to grab a Data Shard. Some spider bots will emerge as you go towards the exit; Bust them up and keep moving onwards.
The next room has black slime all over the ground - a sure sign that there's been some kind of nasty outer space accident here. Avoid it, and climb up to the next floor to find a Walker covered in the gunk. This affects its hacking matrix, creating nodes that'll make Diana's life a little harder. Shoot it in the gut instead of the head if you can.

Looks like the bots throughout the Cradle just got a little creepier. And their hacking matrixes a bit harder. | Image credit: Rock Paper Shotgun/Capcom
Enter the next room and note the red blockage on a doorway on the lower floor. We've run into this before, and our Lim Eraser can't handle it yet, so jump over to the door marked "3". In this next room, pick up the Red Gate Key, observe the holographic conversation about "a mysterious substance that dissolves organic matter" (how lovely) and activate the Logistics Management Station Escape Hatch.
Exiting this room leads you back outside and a cutscene showing the path to the Nexus Tower plays. Once again, you're in a large area overlooking the LunaDigger's territory, with many a collectible scattered beneath you, along with mines and Executors.

Lots to do around here. Just gotta watch out for that LunaDigger. | Image credit: Rock Paper Shotgun/Capcom
Hack the terminal to your left to drop a container on the ground; jump over to it and keep moving to the platform ahead of you. From there, climb up the fallen wreckage behind you to reach a chest with 300 Lunafilaments. Once this is done, you can retrace your steps, hopping over to the container and eventually to the piece of wrecked platform that lies in the centre of this area. There's an annoying and aggressive bot here called the Gunner who will fire at you as soon as you land there, targeting you with missiles and attempting to knock you off into the path of the LunaDigger.

The Gunner hits hard and targets from far away. It's worth using big weapons against it so you can explore this area freely. | Image credit: Rock Paper Shotgun/Capcom
After the Gunner is dead, you'll be more able to use this middle platform as a jumping-off point to explore the area at your leisure. You can take some shots at the Executors from your perch above, activate the mines to give the LunaDigger a headache, or drop down to find an Upgrade Component and a chest with a Cabin Coin inside it, near the dead Lunafilament blockages that require the Lim Eraser to clear.
One of the ramps here leads to another Lunafilament blockage that, when erased, reveals a Unit Printer and one of those yellow security areas that locks you in. An Executor will come out to face you, followed by Walkers, Gunners, Lancers, and a Defender. It's a real cluster to deal with, but when all of the opposition is taken care of, you'll be awarded with a Pure Lunum and stairs that you can take up to a terminal that can be hacked, dropping another big ol' container down into the middle of the excavation region outside.
.jpg?width=2048&height=2048&fit=bounds&quality=85&format=jpg&auto=webp)
Diana's gotten comfortable enough with Hugh to make jokes. "Container masters," cute! | Image credit: Rock Paper Shotgun/Capcom
Head back down, and note the Red Gate near the ramp. Enter it if you still have enough juice after that last combat; inside are very demanding hordes of Watchers, Lancers, and Defenders, and your rewards for winning are more Pure Lunum and the Economize Mod, which makes your last shot with a non-primary weapon unit not break the weapon.
If you're keen on one more puzzle, you can also hack the stack of "MOVE" boxes lying in rows on the side of this arena to reach the top. You'll need to jump across two crane-operated lifts and survive a Gunner shooting you to make it to a chest with the Synaptic Response Mod, which is a good one if you're tired of hacking, as it lets you initiate an auto-hack as long as you successfully perform a Fast Move in combat.

To get to the Synaptic Response Mod, climb and move the boxes in these directions until you're able to hop over the two crane-operated lifts and reach the chest. | Image credit: Rock Paper Shotgun/Capcom
Finally, it's time to use that container we dropped a while ago to cross over to the orange door. Do so, pick up the Training Data you come across, and then activate the Tower Access Point Station Escape Hatch.
Nexus Tower
Finally, we've made it to the Nexus Tower. Go into the next room to see stairs leading down to what looks a giant circular collapsed section in the floor. You can get an Upgrade Component and a Cabin Coin on the way down, and don't miss the last Mini Cabin Figure of this level, chilling atop a piece of machinery here.

One more Mini Cabin Figure to shoot before we descend into darkness. | Image credit: Rock Paper Shotgun/Capcom
Jump down to ground level and move into the hole that leads into the deep depths of the moon. Spooky! The LunaDigger will bust through the wall to make you wet your pants in a little bit, and after it's gone, investigate the caverns it created to use your Lim Eraser and enter a new room with a health re-up, a Walker, and one of those invisible cloaked Creepers to contend with. Kill 'em all, then keep moving to enter yet another circular room going down, down, down, with an Upgrade Component to be found on the way.
Descend and shoot the lone Walker who emerges. Take the Upgrade Component behind it, and keep going to see the LunaDigger crush two bots right before your eyes. Unfortunately, the big bastard will charge at you next, so run and duck into the opening that the Walker came from to watch the LunaDigger slide right by. Whew.

Start running, unless you want the LunaDigger to pulverise you to a pulp! | Image credit: Rock Paper Shotgun/Capcom
Head back to where the LunaDigger smashed the bots and grab all of the Lunafilaments. You'll soon emerge into a cave with glowing sections on the wall; this triggers a cutscene where Hugh and Diana discuss the wonderous nature of Lunum, the moon ore that makes up Lunafilament. When this is finished, move on to enter an imposing room that seems to lead to the apex of the Nexus Tower; the Mainframe Access Station Escape Hatch is here. You can also find a file related to the LunaDigger, who is most definitely in the boss room to your right.
LunaDigger boss fight
Time to end this oversized moon worm. Fighting the LunaDigger begins atop three large containers that give you a nice view of the robot's mouth, its weak spot. Stand on them for too long and the LunaDigger will destroy them with its lasers.

Smile and say cheese, LunaDigger. | Image credit: Rock Paper Shotgun/Capcom
you'll be stuck on the ground once this happens, but luckily you've had plenty of practice throughout this level avoiding the LunaDigger's onslaught. The big guy will chase you around in circles, bursting up from the earth to knock you off your feet from time to time.
Hacking the LunaDigger's matrix can feel laborious, so it helps if you've got the Auto-Hacking Mod to let Diana automatically do the work. Otherwise, avoid the LunaDigger's red targeting circles if you don't want to be fried by missiles, and keep on blasting it in the neck and mouth for maximum damage. Homing Missiles can work wonders here.

When the LunaDigger's finally toast, Hugh and Diana will share a victorious moment together. Hell yeah indeed. | Image credit: Rock Paper Shotgun/Capcom
Once this piece of moon machinery is history, Hugh and Diana can progress towards the mainframe room and work on rebooting IDUS. Alas, some nasty events are about to occur here - watch the cutscene and enjoy as the game proceeds to turn both more dramatic and a wee bit goofier at the same time.
This ends our walkthrough on Pragmata's Sector 4, the Lunum Mines. Diana's in a bad state, and revelations about the true enemy behind all of the shenanigans within the Cradle are now apparent. If you need a breather, return to our Pragmata walkthrough hub and get ready for the last part of our guide, which covers both Sectors 5 and 6 - Experimental Pragmatics and the Central Port.