Mortal Shell 2: Desolate Peak walkthrough (Part 10)
Overview & Key Takeaways
The Desolate Peak is home to a couple of rather interesting and unexpected secrets. You might not expect this, but it's also where you can reach the end credits of Mortal Shell 2 early, in a manner of speaking.
Confused? Intrigued? Follow along with Part 10 of our walkthrough below to learn everything there is to know about the Desolate Peak, including the ins and outs of Baghead's bizarre questline, and how to complete the puzzle of the Illusionist's Cache dungeon.
The Desolate Peak is home to a couple of rather interesting and unexpected secrets. You might not expect this, but it's also where you can reach the end credits of Mortal Shell 2 early, in a manner of speaking.
Confused? Intrigued? Follow along with Part 10 of our walkthrough below to learn everything there is to know about the Desolate Peak, including the ins and outs of Baghead's bizarre questline, and how to complete the puzzle of the Illusionist's Cache dungeon.
Want the walkthrough for a different area of the game? You'll find the full list of all our guides on our Mortal Shell 2 walkthrough hub page!
Desolate Peak walkthrough steps:
- Enter Desolate Peak.
- Begin Baghead's quest.
- Kill the Sheep.
- Conquer the Illusionist's Cache.
- Return to Baghead with nothing.
To see this content please enable targeting cookies.
Manage cookie settings
1. Enter Desolate Peak.
We've already covered the entrance (well, one of them) to the Desolate Peak in passing in our Gloomshade Grove walkthrough, but in case you need it again: from the Citadel Gate, head outside and take the right-hand path down the slope, killing the Brigands and Knaves along your way.


At the bottom of the slope, you can cross the bridge to your right. This takes you to a Bone Gate on the edge of the cliff. Use the Bone Gate, and you'll be transported south, into the Desolate Peak. Simple as that!
Mark step as completed.
2. Begin Baghead's quest.
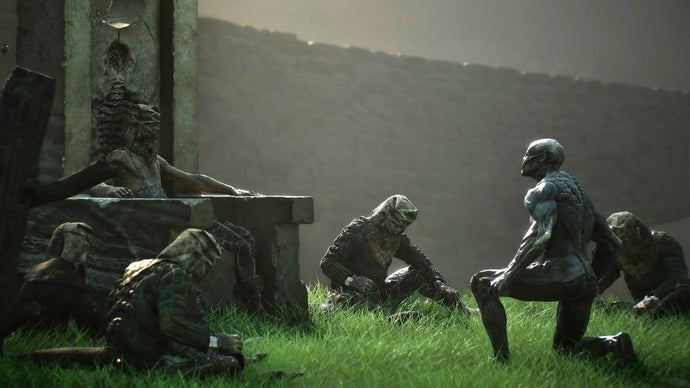
After entering the Desolate Peak, your first stop is immediately ahead of you and to the left, where you'll find a man sitting on a throne on the clifftop, surrounded by sitting figures.

This is Baghead, a recurring NPC from the first Mortal Shell, though you needn't have any knowledge of that for this questline! Speak with Baghead and exhaust his dialogue.
Once you've finished speaking with him, go and sit at your spot around the campfire, as he suggested. Sit for a moment and then stand back up and speak with Baghead again. When Baghead asks "You think you're any different?", respond "Yes".


Baghead will then tell you to bring something that he wants, but doesn't tell you what it is. No, it's not the Special Moonshine that has suddenly appeared behind you, outside the stone structure. Don't touch it.
Mark step as completed.
3. Kill the Sheep.


Forget Baghead's quest for the moment, you'll come back shortly. Turn around from his throne, and you'll see a bridge on your left. There's no actual need to cross that bridge right now - there's nothing down there except another Bone Gate which leads you to a new area to the south, but that's for later.
Instead, head around the right side of the bridge and hit that Bone Statue for a Laterite.

Now head around to the far side of the stone structure. You'll find a lone Sheep, rather randomly placed. Kill the Sheep, and you'll acquire another Sheephead Totem. No, this isn't what Baghead is after. It's just nice to have.
Mark step as completed.
4. Conquer the Illusionist's Cache.
Now enter the stone structure itself. The floor is dominated by a dungeon entrance, but head around it first and check the table in the back-right corner. You'll find a note from one of Baghead's followers:
"The more I give, the less he cares. Why must our master test me so? I've given up all that I own, abandoned my kin. And yet he says I don't understand nothing?"

Also on the table is a 150x Coin Pouch and a Crypt Key. We'll use that key elsewhere in Fainweald later on.
Now enter the dungeon and descend the elevator to access the Illusionist's Cache.


Kill the two Batushkas in the first corridor, and destroy the crates in front of the archway behind them. Step through the archway to reveal the way forward.
In the next room, you'll quickly see the conundrum: there's a pressure plate in front of you which opens up a side passage, and also a stone block which is obviously meant to be placed on the pressure plate. But between the two, there's a hole in the floor. So how do you get the block onto the plate?


Head around the left side of the hole in the ground, and destroy the crates against the wall. Hit the wall behind the crates, with the white symbol on it. The wall will be dispelled, and another two Batushkas will attack you from behind it.
Once the Batushkas are dead, drop down the hole directly ahead of you, and onto the elevator below.


From this lower ledge you can access another corridor, guarded by a Leechtongue. Kill the Leechtongue, and destroy the Bone Statue in the near corner of the corridor for another Laterite.
Destroy the wooden wall at the end of the corridor, and loot the Ventrium beyond. Now turn around and head back up the elevator.
This time, take the right-hand path at the top of the elevator. In this next tiny room, destroy the crates in the corner to your left. Then look through the archway in front of you, and shoot the bell on the ceiling with your Sidearm.

Shooting the bell will raise a stone path in front of you, allowing you to actually pass through the archway. Do so, and the hole in the floor will be filled.
With the hole no longer impeding your progress, head over to the far side of the stone block and attack it to bring it over to the pressure plate. With the block atop the plate, the passage beside the plate will have opened. However, going through that archway also blocked off that same passage with another wall.

So, just head around to the archway and pass through it again. Now the side passage will be fully open. Loot the chest down the passage for a new Tarstone - the Shuddering Stone.


Behind the chest are two things: an illusory wall, and in front of it, a piece of cloth on the ground. Pick up the cloth to acquire Lavender's Robe - the first of your cosmetic Mortal Clothing collectibles.
Then attack the illusory wall beyond the chest to dispel it. Destroy the Gloom Tentacle beyond, and then turn right and dispel yet another illusory wall. Kill one final Batushka beyond this wall, and then loot the throne at the end of the path for a Dorsalite.

That's everything in the Illusionist's Cache, so turn around and head back out of the dungeon.
Mark step as completed.
5. Return to Baghead with nothing.
Now, return to Baghead. If you picked up the Special Moonshine from the front of the stone structure, put it back where you found it. It's a red herring; if you want to complete Baghead's questline, you can't be holding it.

Speak with Baghead, and answer "Yes" to each of his questions asking whether you're sure that it's the right thing to turn up empty-handed.
Finally, Baghead will congratulate you on your shrewdness, and ask if he can help you. Interact with Baghead one more time, and enjoy what follows.


Yes, it's a joke "ending" to Mortal Shell 2, where you take Baghead's place, forget about your quest, and just chill doing nothing forever. Don't worry - after the end credits, you can just load your game as normal and continue as if it never happened.
Mark step as completed.
With Widow's Overlook, Gloomshade Grove, and the Desolate Peak all completed, you've now discovered a grand total of three different entrances to the next region we'll be visiting. It's a fairly sizeable area, so be sure you don't miss a thing by following along with Part 11: our Mortal Shell 2 Ruins Of Nochte walkthrough.